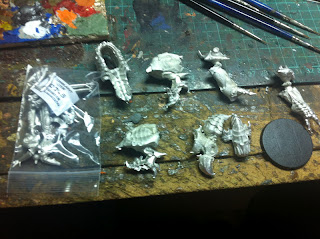
One of the lads at the club was getting rid of some random bits that he had and decided to nab a ogrun bokur off him,
I've liked the model for ages but never really thought about buying one and as I've been on a model spending spree cut back, with the ogrun being the only model that I've bought this month I decided to splash some paint on him and add it to the pledge.
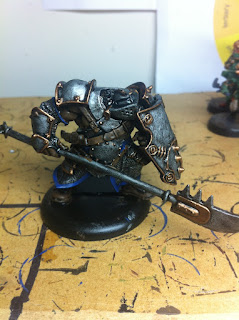
So I decided to subtly convert the bodyguard and I'd spotted a conversion via google images and decided to rip it off!
I replaced the head with a spare khador jack dead and the shield from a man O war kovnik with the khador symbol filed off, a spare sword in a scabbard from a everblight blighted swordsman and he was good to go!
Undercoated and then tin blitz base coat
I decided to give the new GW dry paints ago, and grabbed a necon compound and the contents surprised me a little....
its really solid state but you don't need a great deal on your brush to get a good effect
so a few moments later one dry brushed chap
I added some basic colour and washed him in army painter dark tone (badab black) and was quite happy with the result,
I hit him with some seraphim sepia and then re highlighted the leather straps and the blue around his cloak, a touch of red wash for a battle worn look and apart from the base he's done and dusted!
So onto the "pledge" its been a cracking month again...
Bought - 1
Painted - 38
Difference +37
so nearly 9 months into the year and this is where I'm currently standing...
Bought - 203
Painted - 326
Difference +123
lovely! plenty of room for the new chaos stuff that comes out next month!
Tuesday, 28 August 2012
Friday, 24 August 2012
Infinity - Conquering the Caskuda!
This is my attempt at a "how to" for the assembly of a Combined Army Caskuda,
So after cracking the box there was a fair few bits! and no instructions!
After cleaning off the flash etc, I found the fingers for the left arm,
Whilst that was drying after some playing about stuck the "groin" to the upperbody
Now it took me a while to suss out what these were for...
The heals of the feet! again bang them on no worries!
Whilst I was on the legs I put the go faster turbo booster jets?
Then slapped the head on, and its at an angle so go with the flow on that bit,
then it was just a matter of putting the legs and arms onto the torso, there are 3 little bits that you stick on the arms and the forehead but there fairly simple, I used the time tested technique of superglue and blu-tack.
The only issue I have with this kit is that the 40mm base that comes with it is a joke! I ended up making my own from a template of a dreadnought base,
The reason for all the rubble on the base is in the fluff these things deploy as a meteorite and then emerge fighting, so I figured I could make a funky looking base.
I got some plastic with steel decking imprinted on it cut out a circle and then cut into the middle leaving a bit so that I could bend it in to look like an impact.
So the base coating done,
The very boring part of the highlighting part way through
and suddenly its nearly done!
And the 99.99% finished model, just another wash of green on the orange and its good to go!
the wings were a nightmare and kept breaking off and the gluing of the plastic see though bits wasn't as bad as I thought.
Build wise its not too bad you just have to take your time, paint wise it was a bit of a drag and being quite organic looking was quite a challenge but I went for a look that I can now use as a Nurgle deamon prince ;)
So the only thing that I'm gonna have to suss out is how to transport the bloody thing now!
Monday, 20 August 2012
Infinity Combined army.....
A couple of the chaps at the local gaming club are always banging on about getting some games of infinity in, but as always never happens due to SMS (shiny model syndrome)
So with the new campaign book coming up soon I thought that I should get back in on the action! and I've had a combined force kicking around for a couple of years now, and with trying to cut back on the random model buying they would be a nice little side project to stop me getting sidelined with all the cool stuff out there!
So the combat group,
Normal grunt chap, the bases have since been done so that they look like decking,
Spectro killer, lovely model to paint and with the tips I picked up from the WAMP/Golem painting session put those new skills to the test,
An angry looking combat chap,
The only thing I've got left to do is the TAG and I'll cover that in my next post,
Friday, 17 August 2012
6th Ed Starter set models?
I spotted this via facebook this morning.....
40kproject.blogspot.co.uk
for those too lazy to click...
Not overly fussed.... afterall its a Dark Angel No doubt Ross & Spencer will jizz in there pants over this ;)
Yep liking this, I'll take 50 please!
Very very nice, lighting claws look sweet, shouldpads nice, not too sure on the bone on his belt though?
A bit of jiggery pokery and you've got cypher ;)
liking this third eye though, I though that was an astropath thing?
funky looking lord type chap, If this is whats in the starter set then god knows what sexiness will come with the codex!
Saturday, 11 August 2012
Road Trip, WAMP 2012
Last week one of the local chaps mentioned a painting compo over at Maelstrom games so I figured I might as well have a wander and see what shiny stuff was about,
I thought I might as well throw some odds and sods into the mix and see how they did, I took my slannesh sorcerer jump pack chap, the disc riders I finished yesterday, the pimp my ride rhino and the oblit's that I did time ago.
Boy oh boy the WAMP boys did not disappoint! The level of painting was fantastic and better than what I've seen before at golden daemons and at Salute!
Any way enough waffling I'll let the pics do the talking!
A lesson on how to paint faces from a chap who runs/works(?) at Golem Studios Tommie Soule, Superb teacher and the basic principles that he went through was spot on! just a shame I had to go into work. and with going into work I missed out on the pigment & weathering lesson as well!
So because I had to shoot off early I left Coops in control of my stuff and this is the scoring sheet for the single miniature that I entered,
really low scores, but at least I know the standard now and to remove the mold lines ;)
Subscribe to:
Comments (Atom)


