Thursday 29 September 2011

Secrets of the third reich.... making the club gaming board

So with the GT only a day away and all the stuff painted for my force, I've played plenty of warm up games to get my head round the rules and lost most of them so I'm going to go in with the usual "Anton" attitude and have a good two days of gaming regardless of the results,

I'm hoping to actually learn some stuff and hopefully get some inspiration for a future force.

Now to keep me off the malestrom website and Ebay, I've started making a start on the themed board for the Phat cats,

So far I've picked up the following for the board:

1/35 V2 rocket
1/48 V1 rocket
1 sheet of 50mm underfloor installation foam (I'll see how it compares to the blue foam I used to use)
1 sheet of 3mm MDF for mounting scatter terrain
3 lengths of doweling
1 Bread knife (I don't think the other half would entertain me using the kitchen one!)

So the V1 that I picked up with a winterguard so you can see the size, I was surprised by the size, and the kit went together no worries! 


so I decided to dust off the hurst arts molds and do some casting for the buildings for the table, I figured it would be cheaper that way so I can spend money on 1/48 kits to litter the table.

Now the only problem with this is I've not done any casting for about 6 years so if you've never seen this stuff before or wondered what you can do with it I've put together a quick casting guide.

I took over the kitchen for my casting marathon but made sure that the washing up was done before hand so that I gained some browny points ;)

I use a heavy duty bin liner so that the over spill is contained and set out the moulds that I wanted to cast, I use a old plastic cider bottle thats been cut so only the bottom bit is used, an old plastic water bottle again cut in half to measure out the water, a wallpaper scraper, and a lollypop stick to mix the plaster and water together.


So onto the mix, I use about 150 ml of water and added enough plaster till it look like the following pic, it was 4/5 table spoons heaped


So onto the first pour... 

the trick I've learned over the years and didn't forget was to pour the mix onto the raised part of the mold rather than into the actual cast areas this way you don't trap alot of air and the way that the mix flows over the mold you can control it better.


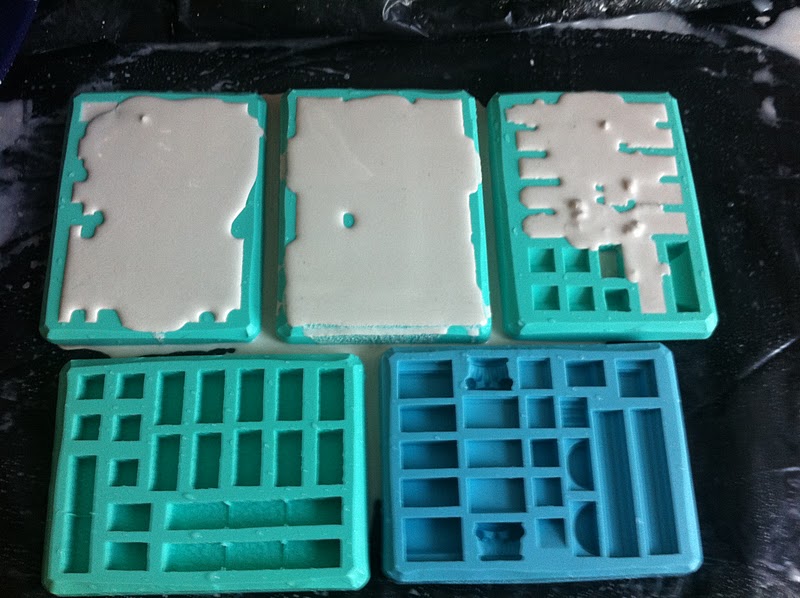
 I managed to get just over 2 moulds with the first mix, notice the lumps on the semi-done mold this is where the plaster and water wasn't quite mixed together right but its no problem, I quickly made a second and did a second pour.


 So after 10 to 15 mins I then scrape the molds, now I don't press down on the mold I just let the weight of the wallpaper scraper do the work, and once thats done I left it for about an hour


 some of the pieces that I got out of the first lot


and after a bit of a hardcore casting session I managed to get this lot done in about 8 hours, the top tray is what I did in about 6 hours and the bottom one was in an evening so about 2 hours


So once you have a routine going you can pump out quite a bit, its just important to remember that you don't leave the scrape too long otherwise you'll have uneven bricks and don't go mental with the casting!

All I've gotta do is wait for them to dry and with the sun its not gonna take long at all, in the mean time I'll start working on the V1 launch ramp, but more of that for another post.

so for more info on the hurst arts stuff and have a look at his website,

www.hirstarts.com

the design derby is worth having a look at some superb buildings on there,

Monday 26 September 2011

Here comes the chaos..... back from the dead!!

So after a week of doing various "family" stuff with the other half being off work and the Golden Child's first birthday to plan and sort out, I've not really done that much painting this week,

but what I have managed to get done I'm quite happy with, I've managed some leaders for the up and coming warhammer chaos army starting with the lord....


I found this bad boy kicking around in one of my bits boxes and figured I might as well use him as my lord, turns out that this is a limited edition  gamesday miniature and after being told this found him on ebay for about £40!

I've angled him up so that you can actually see the front rather than a shadow, 


the view that I'll see the most of, I'm quite happy with the red of the cape but I did have quite alot of practice with the sann hann! 


The "newish" plastic chaos scorcer painted up to please Kurt... (the first game I used him he kicked ass!)

As always I've been keeping my finger on the geek pulse and spotted this cracking bit of kit on Ebay and ended up paying less for it than I would if I bought a baneblade brand new!!


 In the traditional "Anton" fashion no sooner had I unpacked it I'd already applied the initial coat and done a heavy dry brush....

 then I started to ponder at it looking at the cannon and thinking that it could be better, so out came the pliers and off came the cannon to be replaced with one that I picked up a while back from the states, that same evening Coop's saw the about picture and felt that it wasn't "spikey & Chaosy" enough now I'm not a massive fan of the spikey chaos but I agreed on the chaosy factor there was some elements in there but not enough for grand father nurgle to give it his blessing! 

So some random bits and green stuff later I ended up with...


I'll continue to take snaps at each stage but it's going to be my "reward" project so that I can take my time on it and not just pump it out, but I'll only count it as one model towards my "pledge"

Whilst I was down the club on Thursday I wandered into the kitchen were we tend to mooch whilst the ninja's finish beating the crap out of each other and seen Coach & Sonny playing warmachine on the table and the best use of a paper plate as a damage grid for his jacks!


As a bit of a break from all of the SOTR that I've been playing recently I got a text from Nick saying that he was starting a Cutlass campaign and did I want in... stupid question really ;)

So after convincing Coops to play Cutlass rather than flames it was me and Cooper against Nick's Superhard crew and we was after his loot!


After some very un-orky sneaking through the trees I decided to go for it and paid the price with most of my gang getting the be-jesus kicked out of them in combat and the Orc captain losing his had to a serious injury... 


But even with his hand lost Captain (insert name here) will be back to lead his crew to victory! 

I've not really made much of a start to the secrets of the third reich themed board, but I picked up aload of these pallets so can make some real cool scatter terrain, 


So the doomsday clock is no longer an issue as I've managed to get all my bits done well in time and as for the pledge thats well under control for this month!

Bought - 17

Painted - 49
Difference + 29

I'm going to pick up yet another system at Derby at the weekend in the form of Saga from gripping beast, basicly 28mm vikings on the rampage.. carn't wait!! and more than likely some MERC's stuff as well.

Tuesday 20 September 2011

Secrets of the third reich.... bits finished off & whats next???

So the bren carrier is done and dusted!! and just as I've finished off my British secrets army I'm now pondering what to do??


Well its simple do a themed board for the club!!

I managed to get my hands on one of these.....


ok so its a tad big being 1/35 but looks good to me and not bad for a tenner! So I'm going to do a rocket assembly type board, I'll make it modular so that stuff can be moved about as needed all I've got to do is suss out what do I want on the board! one of the guys from the Hinckley club has sourced a supplier of cheap 1/48 armour so it'd be rude not to have some of those around in various states.

But I did manage to pick up these off Ebay the other week only after the auction finished did I notice that the green stuff was a little OTT!, but after working out that the ravener bits would have cost me £56 if I'd bought two boxes so I wasn't that bothered!

I decided to hack these to bits as I've a game of 40K coming up in a couple of weeks,


and as always when I convert I managed to nearly slice open my finger.... 


But I did manage to get one mocked up all I need to do is repair the missing bits and a little green stuff to blend in the upper body and the snakey bit and jobs a good un!! 


I'll use these as fiends of Slannesh, and with some digging around all I've only a few deamon bits left to paint and I'll be looking at another finished army, shocking!!

Question is will the fantasy army ever get off the ground, and will the 40K chaos boys be finished in time for 6th Ed and the new codex??