I'm hoping to actually learn some stuff and hopefully get some inspiration for a future force.
Now to keep me off the malestrom website and Ebay, I've started making a start on the themed board for the Phat cats,
So far I've picked up the following for the board:
1/35 V2 rocket
1/48 V1 rocket
1 sheet of 50mm underfloor installation foam (I'll see how it compares to the blue foam I used to use)
1 sheet of 3mm MDF for mounting scatter terrain
3 lengths of doweling
1 Bread knife (I don't think the other half would entertain me using the kitchen one!)
So the V1 that I picked up with a winterguard so you can see the size, I was surprised by the size, and the kit went together no worries!
so I decided to dust off the hurst arts molds and do some casting for the buildings for the table, I figured it would be cheaper that way so I can spend money on 1/48 kits to litter the table.
Now the only problem with this is I've not done any casting for about 6 years so if you've never seen this stuff before or wondered what you can do with it I've put together a quick casting guide.
I took over the kitchen for my casting marathon but made sure that the washing up was done before hand so that I gained some browny points ;)
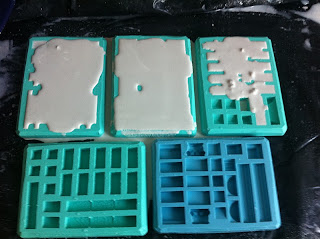
I use a heavy duty bin liner so that the over spill is contained and set out the moulds that I wanted to cast, I use a old plastic cider bottle thats been cut so only the bottom bit is used, an old plastic water bottle again cut in half to measure out the water, a wallpaper scraper, and a lollypop stick to mix the plaster and water together.
So onto the mix, I use about 150 ml of water and added enough plaster till it look like the following pic, it was 4/5 table spoons heaped
So onto the first pour...
the trick I've learned over the years and didn't forget was to pour the mix onto the raised part of the mold rather than into the actual cast areas this way you don't trap alot of air and the way that the mix flows over the mold you can control it better.
I managed to get just over 2 moulds with the first mix, notice the lumps on the semi-done mold this is where the plaster and water wasn't quite mixed together right but its no problem, I quickly made a second and did a second pour.
So after 10 to 15 mins I then scrape the molds, now I don't press down on the mold I just let the weight of the wallpaper scraper do the work, and once thats done I left it for about an hour

some of the pieces that I got out of the first lot
and after a bit of a hardcore casting session I managed to get this lot done in about 8 hours, the top tray is what I did in about 6 hours and the bottom one was in an evening so about 2 hours
So once you have a routine going you can pump out quite a bit, its just important to remember that you don't leave the scrape too long otherwise you'll have uneven bricks and don't go mental with the casting!
All I've gotta do is wait for them to dry and with the sun its not gonna take long at all, in the mean time I'll start working on the V1 launch ramp, but more of that for another post.
so for more info on the hurst arts stuff and have a look at his website,
www.hirstarts.com
the design derby is worth having a look at some superb buildings on there,


No comments:
Post a Comment