
Recently the 30K system has become quite popular at the club and Dan has choosen the Thousand Sons as his Legion and produced some of the most gorgeous models I've seen for a long time!
Anyway over to Dan for his how to guide!
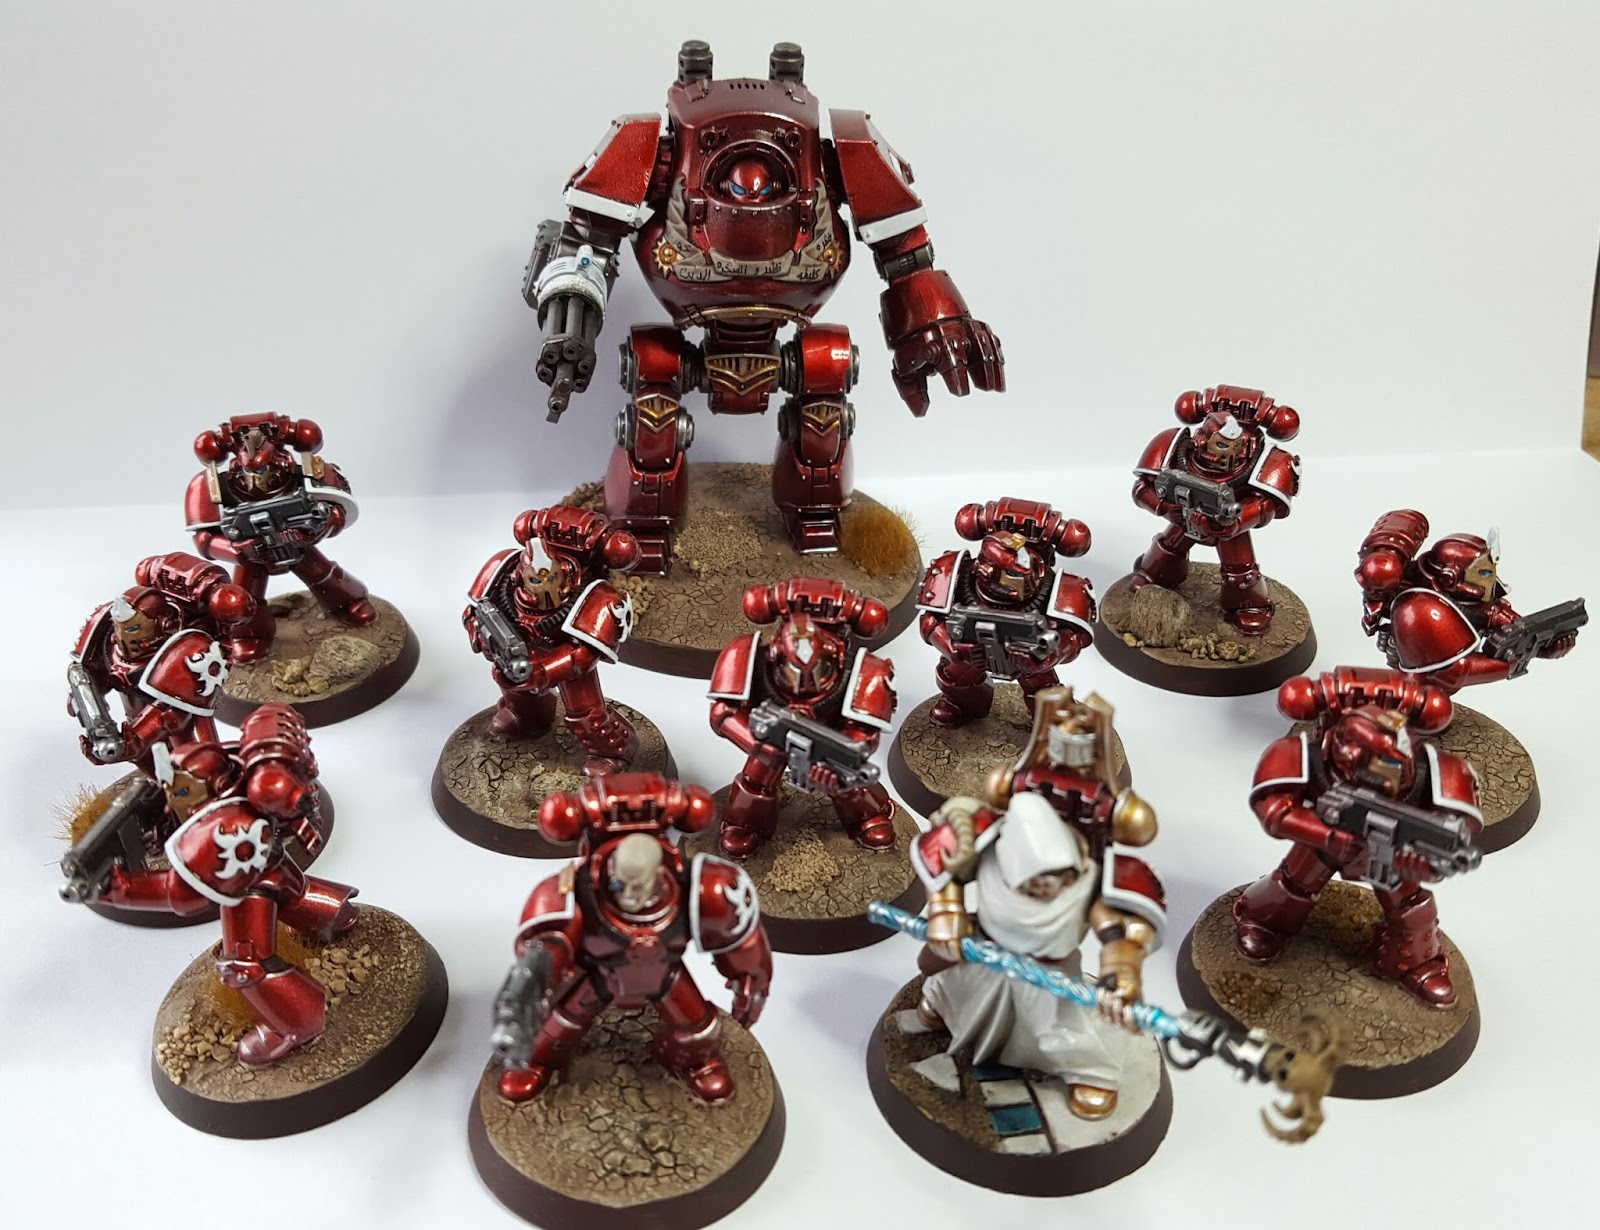
Everytime I post a picture of my pre-Heresy Thousand Sons someone asks me how I achieve the above effect. If I were to describe it, it is like the metallic colour you get with cars. Given that I keep promising to write a tutorial explaining my method I thought I’d better pull my finger out and actually do it! First off, let me say a big thank you to Mr Anarchy himself, Anton, for agreeing to host this tutorial mainly so I didn’t have to create and look after a blog myself.
Right! Enough procrastination; let’s crack on shall we?
THE MATERIALS
The paints
Primer. Enough said really. I’ve read that a gloss primer works best for this effect but having tried it I can honestly say I can’t tell the difference between a gloss and a matt primer. A properly prepared model is the only requirement I would put on this.
Minitaire Ghost Tint (Fresh Blood in my case).The translucent/metallic effect is achieved using a relatively recent addition to the painter's’ pallette often referred to as “clear paint” or “candy colours”. I first encountered it last year at Derby World Wargames show where I saw a few examples of how clear paints could be used to achieve some really interesting effects. There are a number of ranges available; Forgeworld do a range of these for instance, however I use Minitaire Ghost Tint Fresh Blood exclusively for my Thousand Sons. To be honest I’ve not used anything else so I couldn’t say with any authority whether other options are better or worse. I bought mine from Barwell Bodyworks (where I also buy most of my airbrushing equipment - links below). You will often find them at wargaming shows as well where they have the full range for sale.
You will also need a couple of shades of metallics; one darker and one lighter. I use Vallejo Model Air colours Gunmetal and Steel. I find Vallejo Air metallics to be the best quality metallic paints in my experience but, again, can’t say I’ve tried them all.
Finally you will need a brown tone shade. I use brown tone because it keeps the translucent red vibrant whereas a black tone makes the shadows harsher. I’d recommend experimenting to see which works best for you but the process is the same regardless of the tone of shade you use. Personally I use GW Agrax Earthshade simply because I have gallons of the stuff in the house!
Airbrush
I appreciate that an airbrush and compressor can be a significant investment for the hobbyist however I cannot emphasise how much having one has revolutionised my painting. I apply all my basecoats with an airbrush now and also prime all of my models using it as well. For the rest of this tutorial you can assume I have applied all coats using an airbrush unless I state otherwise. Most critically, the application of the ghost tint works best through an airbrush if only because it applies it in an even layer. You can apply it with a brush but you have to be very careful not to let the colour pool and drip which will mar the overall finish.
I won’t say anymore about airbrushes as that’s not the focus of this tutorial, however there is loads of really great advice about what to get and how to use one, on the web. Google is your friend (although it might be spying on you).
Other materials
Masking tape! There are a number of “gotchas” when using ghost tints that I discovered the hard way. I’ll discuss how masking tape can help you avoid one of them in the method below.
THE METHOD
- If you attach your models to their bases before painting and use an airbrush then I strongly recommend you mask off the base before starting. Ghost tint pigment can bleed through light colour paints applied directly over the top of it. I use desert themed bases for my Thousand Sons and the first time I painted it over a ghost tint sprayed based the red pigment ruined the base which meant I had to remove the paint and ghost tint from the base before starting again. Since then I have masked off my bases before starting. I’ll cover what to do for painting light coloured details on the model itself later in this method.
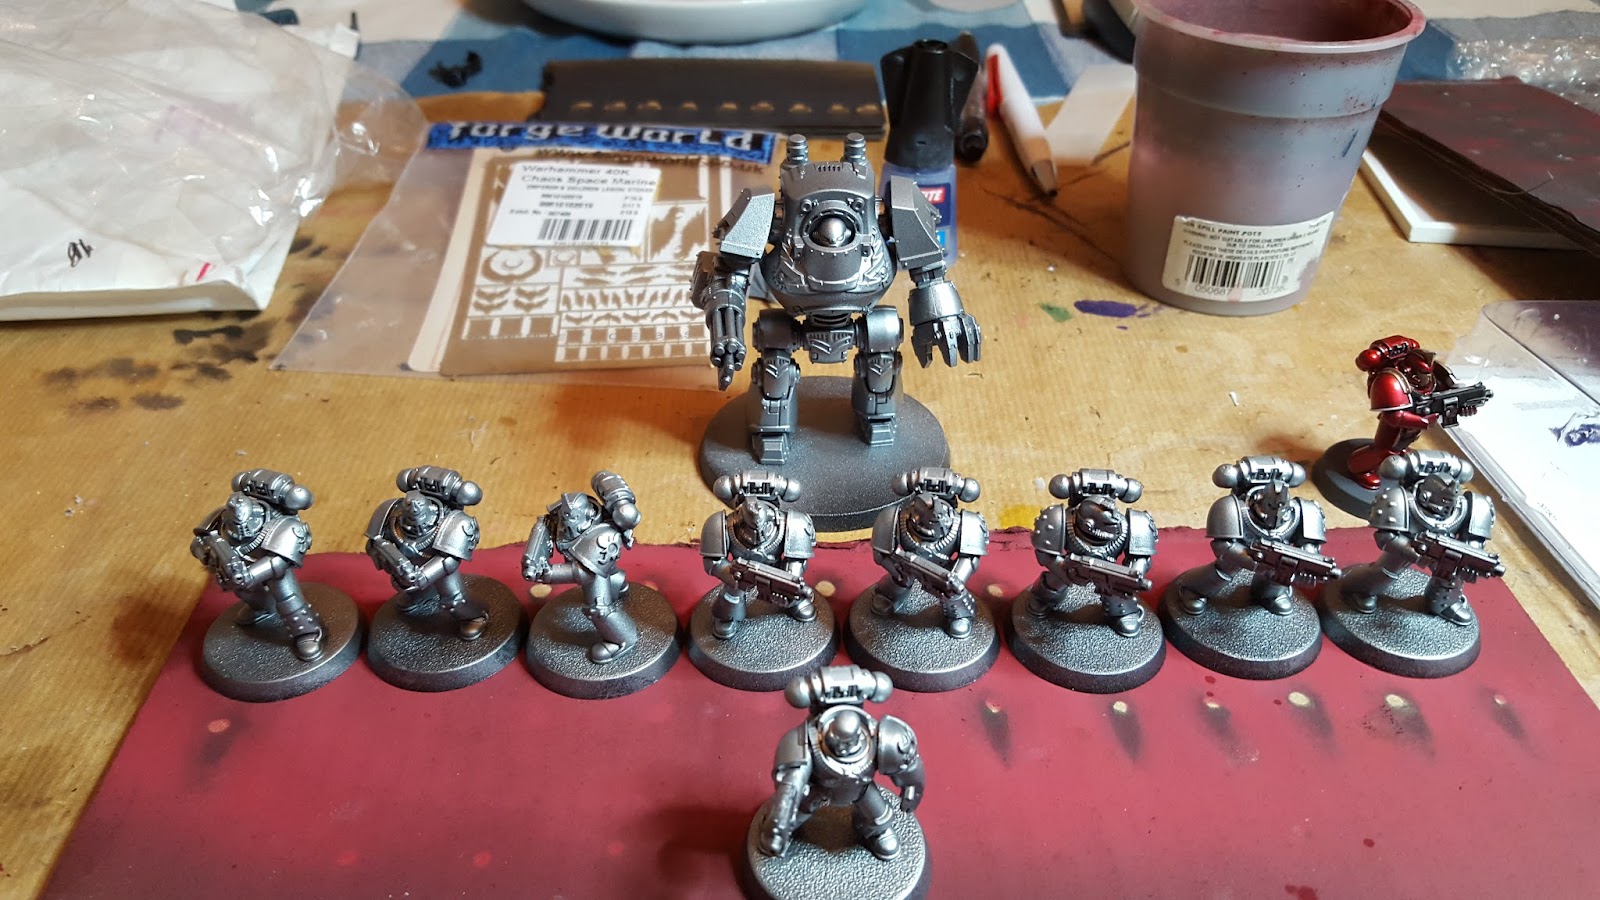
- After priming, base coat the model in your dark metallic colour, Vallejo Model Air Gunmetal in my case. Make sure to get an even coat over all of the areas you will be applying your ghost tint over later. For my Thousand Sons, this means the whole model.
- Give the model a “zenithal” highlight with your lighter coloured metallic. At least it is referred to an a zenithal highlight, although literal use of the word means something different. This is painting tutorial though not a language lesson so let me explain what I mean. If you shine a light on your model from a high angle you will notice some of the surfaces catch the light whilst others remain in the shade. By doing a zenithal highlight we’re replicating this effect using different shades of paint. This is simple using an airbrush; you basically spray down onto the model from an angle approximately 60 degrees from the horizontal all the way around it. In the image below your work surface is along A, your model is at B and your airbrush at C,

You can do this manually without an airbrush although it is more time consuming. My top tip to do this would be to actually shine a lamp down onto the model and paint the areas where the light hits, the light colour. Eventually you will be able to do this without using this trick but it’s a great way to learn where to apply highlights!
Next we’re going to apply a pin wash to the model, in my case with Agrax Earthshade. By pin wash I mean applying the wash with a brush just to the creases and crevices on the model that a wash would settle in to. This has the effect of creating shadows on the finished model but within the tone of the ghost tint finish. The neater you pin wash the better the final effect will be. You’ll notice I’m not particularly neat but then I’m old and clumsy ...

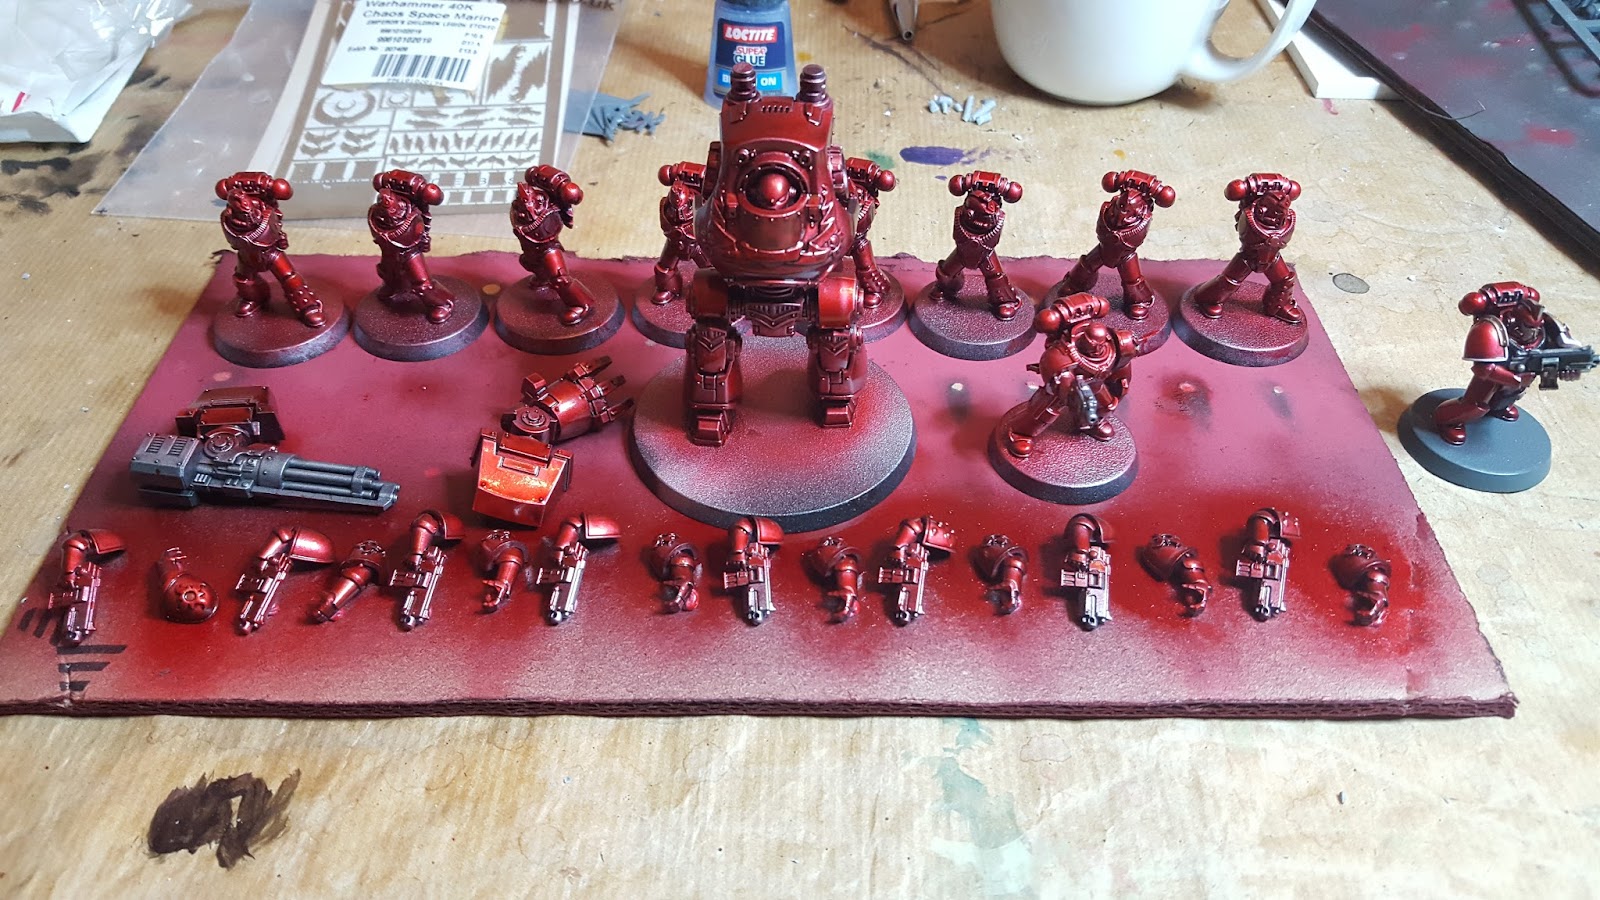
Apply the ghost tint over the areas of the model you want. Again in the case of my Thousand Sons, this is the entire model.
I recommend you apply the ghost tint in two or three thin coats rather than trying to get an even coat at the first attempt. The ghost tint is very thin in consistency; it will go through an airbrush without having to thin it any further but that means if you apply too much it will drip and pool which ruins the effect. The first coat may even appear patchy but don’t worry, once it is dry (I would allow a minimum of five hours between coats) the second coat will give it that deep, vibrant colour. You can apply further coats if you want to deepen the colour but I normally find two coats to be sufficient to achieve the desired effect.
Make sure you clean thoroughly whatever tools you have used to apply the ghost tint be they manual or airbrushes. The ghost tint dries like a varnish so it’s really important to make sure you clean up properly to maintain your equipment. Fortunately it’s water soluble so cleaning up is very easy. For your airbrush I recommend using a good airbrush cleaning solution as well to make sure you’ve completely flushed the ghost tint out of your airbrush.
Make sure you clean thoroughly whatever tools you have used to apply the ghost tint be they manual or airbrushes. The ghost tint dries like a varnish so it’s really important to make sure you clean up properly to maintain your equipment. Fortunately it’s water soluble so cleaning up is very easy. For your airbrush I recommend using a good airbrush cleaning solution as well to make sure you’ve completely flushed the ghost tint out of your airbrush.
Finally pick out the details on your model to finish it off! There are a few tips for where you have to paint over ghost tinted areas:
As I mentioned earlier, the pigment in the ghost tint can bleed through light colours if they are applied directly over the tint. My Thousand Sons have a fair amount of white on them. When I first tried this the white kept turning pink as the tint bled through. I found that base coating the areas I wanted to be white with a darker colour first prevented this bleed through. For white I use a dark grey base (GW Mechanicum Grey to be specific).
Even colours that don’t suffer from a bleed through benefit from some kind of primer base before application. The ghost tint finish can be tricky for other paints to adhere to properly. Black paint or even a wash with something like Nuln Oil will help matters enormously.As I mentioned earlier, the pigment in the ghost tint can bleed through light colours if they are applied directly over the tint. My Thousand Sons have a fair amount of white on them. When I first tried this the white kept turning pink as the tint bled through. I found that base coating the areas I wanted to be white with a darker colour first prevented this bleed through. For white I use a dark grey base (GW Mechanicum Grey to be specific).
You can weather your models just like you would do any other model. I keep it low key as I like the cleaner look. One trick that is very effective is a selective edge highlight in silver here and there on some sharp edges that would get bashed and chipped.
Conclusion
That’s it really! I keep the weapons separate from my models for painting for ease of painting. In the photos above I kept entire arms separate but since then I’ve found it’s better to have the arms fixed onto the model and just keep the weapons separate.
Links
Barwell Bodywork - nice people selling great stuff!
http://www.badger-airbrush.co.uk/minitaire.html
No comments:
Post a Comment